

COVID-19, April 2020: One of our restaurant clients (link to Régine Café) approached us because, after their two restaurants had to close, they wanted to offer their dishes for pick-up and delivery. This article is not about a fictitious project, but an actual project which highlights all the challenges we faced. As they say “the devil is in the details”. That’s the reason why we wanted to share here the way we set up a multi-location food pick-up and delivery service, in their WooCommerce shop.
Note: The article may include some WooCommerce affiliate links, i.e., I may get a small commission if you purchase some of the WooCommerce plugins I mention.
Let’s start by discussing other options than WooCommerce, which are available to restaurants for pick-up and delivery.
As you can see, in the end, after we did all the development work on WooCommerce, our client decided to use a third-party service, Ishopfood and they also considered Ueats (not to confuse with UberEats). The reason was that these services integrated with his POS system and WooCommerce didn’t.
What are the differences between Foodora, Ubereats, Ishopfood, or Ueat and other platforms?
On one hand, services such as Foodora and Ubereats list your restaurant and your menu on their application, they take the online orders and have their own drivers deliver the food. The cost to the restaurant is about 30% of the order value.
On the other hand, with services such as Ishopfood and Ueat, the restaurant is buying the use of the platform but needs its own drivers to deliver food. There is a monthly subscription fee that may be combined with a fee per transaction. As you can see in these examples, the platforms offer a lot of functionalities.
- A restaurant on Ishopfood: Pizza Gepetto
- A restaurant on Ueat: Copper Branch
What is the right pick-up and delivery application for your restaurant?
The answer is: “It depends”. There are a number of factors to take into account to decide:
- Do you already have a website, an online store?
- Do you have existing products on your online store such as gift certificates or merchandise (mugs, T-shirts, sweatshirts with your logo)?
- Is it for a single location or multiple locations restaurant?
- Do you have a different menu for each location?
- What kind of volume do you anticipate?
- Is it both pick-up and delivery or only one of these options?
- Do you need to set up a maximum number of orders per time slot?
- Do you want customers to be able to order in advance, even when your restaurants are not open?
- Do you want customers to select their pick-up or delivery times?
- Do you mind having your own drivers?
- Do you need functionalities such as “add tips”, “add-ons” menu items?
- Do you want the order system to be integrated with your existing POS (point of sale) system?
In the case of Régine Café, it was not a simple situation:
- We were looking at two restaurants, with two different menus, initially for pick-up, and possibly later for deliveries.
- It was crucial to limit the number of orders per time slot as their restaurants are very popular. They needed to anticipate a high volume of orders.
- They wanted the functionalities of product “add-ons” (add some bacon to my scrambled eggs, please!) and tips at checkout.
- We also set it up so that people could place orders when the restaurants were closed.
- They were already selling other products online (gift certificates), which required setting up the shop differently than if they only offered meals for pick-up and delivery.
- Finally, they did not have their own drivers for deliveries (at least not yet), so they needed that third-party service for delivery.
Even though it required quite a bit of work, we were able to satisfy all those demands with WooCommerce. But ultimately, we could not offer the option to integrate WooCommerce orders with the existing client’s POS. (Note that WooCommerce does offer integration with some POS systems.)
The restaurant chose several applications for deliveries (Ubereats, Foodora, etc.) to test the market and understand the volume of orders. However, in the long-term, this option is too expensive to make financial sense.
For pickup, they preferred Ueats but wanted this application to allow them to set up a maximum number of orders per time slot. It is more expensive than Ishopfood but has a nicer ergonomy and a lower flat monthly fee (plus a fee per transaction).
We are really in times of experimentation. It is very possible that Régine Café comes back to the WooCommerce solution. Right now they are testing the convenience and the costs of those other platforms.
A step-by-step guide to set up a multi-location food pick-up and delivery WooCommerce shop for a restaurant or food business
Now, time to dig into the details. How did we do it, which theme and plugins did we need, and what were the challenges?
-
Set up WordPress
I assume here that you already have a WordPress website. If you don’t, there are numerous articles on how to start. Choose a hosting service with a one-click WordPress’ install to make your life easier, e.g. Bluehost.
-
Select an e-commerce theme
You can install WooCommerce, the e-commerce plugin for WordPress on any WordPress theme. However, I recommend choosing a theme which has been specifically designed for Woocommerce, because it is likely to include additional e-commerce functionalities. Also check the ratings of the theme in terms of performance: a badly designed theme will slow down your website and customers will walk away. After extensive research, my own preference is the Flatsome theme. It’s highly rated in terms of performance and has a nice UX builder, which makes personalization very easy. When activating Flatsome, it even installs WooCommerce and other plugins for you. Super simple!
-
Select pick-up and/or delivery functionalities (order pick-up and/or delivery WooCommerce plugins)
Warning: “Excuse my French.” Really! The print screens images below may include a few words in French, but I made sure everything was easy to understand. The reason is that Régine Café’s website is a French website. To show you various features, I changed what I could easily change, but did not change all the WordPress and e-commerce files to English.
In the previous section, I listed the questions you must ask yourself to design your pick-up and delivery shop and select the plugins you need.
We came across three plugins to “do the job”: Delivery Slots, WooODT Lite and WooODT Extended. However, depending on your specific needs, one will satisfy your needs better than the other.
Note: Our comments are based on the April 2020 versions of these plugins. The author of Delivery Slots commented that he was adding features and improving his plugin.
-
Money-back guarantee
It is good to avoid paying for a plugin that doesn’t work. Delivery Slots offers a 14-day trial, with the possibility of cancellation in that period of time. WooODT says that their support team will work with you if you have any problem with the plugin on your site, and will reimburse you if the issue cannot be fixed.
-
Pick-up and/or delivery
Delivery Slots focuses on deliveries. For deliveries, you can set up shipping zones per zip code (postal code), to define which restaurant delivers. Watch their video: “How to set up WooCommerce Delivery Slots by Shipping Zone and Method”. You can also add a “local pick-up” shipping method but the checkout will show “shipping: local pick-up” and then the Delivery Slots plugin will say “delivery”. The plugin author did mention that they had code for the child theme’s functions.php file to change the word “delivery” to “pick-up” when the local pick-up option was selected. But for pick-up only, it gets confusing for the customer.
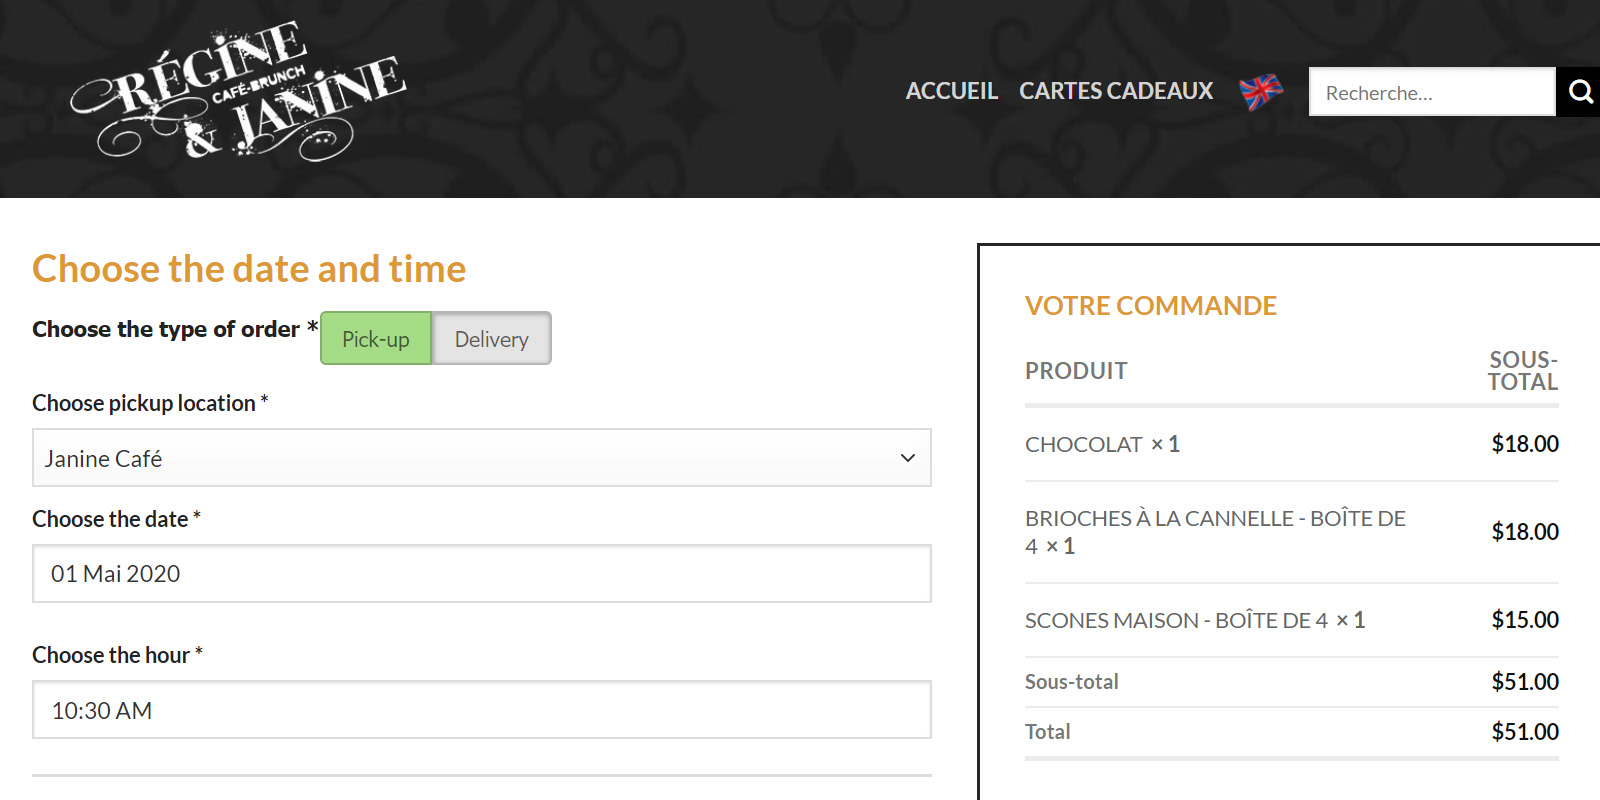
With WooODT free version (WooODT Lite), you can offer pick-up only or delivery only, or both. You can set pick-up and delivery separately.
-
Multiple locations
Delivery Slots is not designed for multiple locations. For deliveries, you can solve the problem by creating different shipping zones (see above). But for pick-up from multiple locations, it simply doesn’t work: at checkout, you’ll see “local pick-up” without knowing which restaurant!
On the other hand, the paid version of WooODT (WooODT Extended) allows customers to choose between pick-up and delivery and from which restaurant!
-
Multiple menus
Régine Café and Janine Café may be a bit unique. Usually either a restaurant is a chain and all the locations have the same menu, or restaurants are completely different, each with their unique branding and menu. Our client was a mix of the two. Most of the menu items were the same for the two locations, with the exception of a few dishes.
In this case, our recommendation is to set up one menu, to clearly indicate the few items that can only be ordered from one location. An alternative is to set up several menu pages, one for each location.
-
Maximum orders per time period
Those two plugins allow the customer to select a date and time of delivery. If your restaurant is very busy, you must make sure that you can limit the number of orders per time slots. WooODT Extended offers that feature.
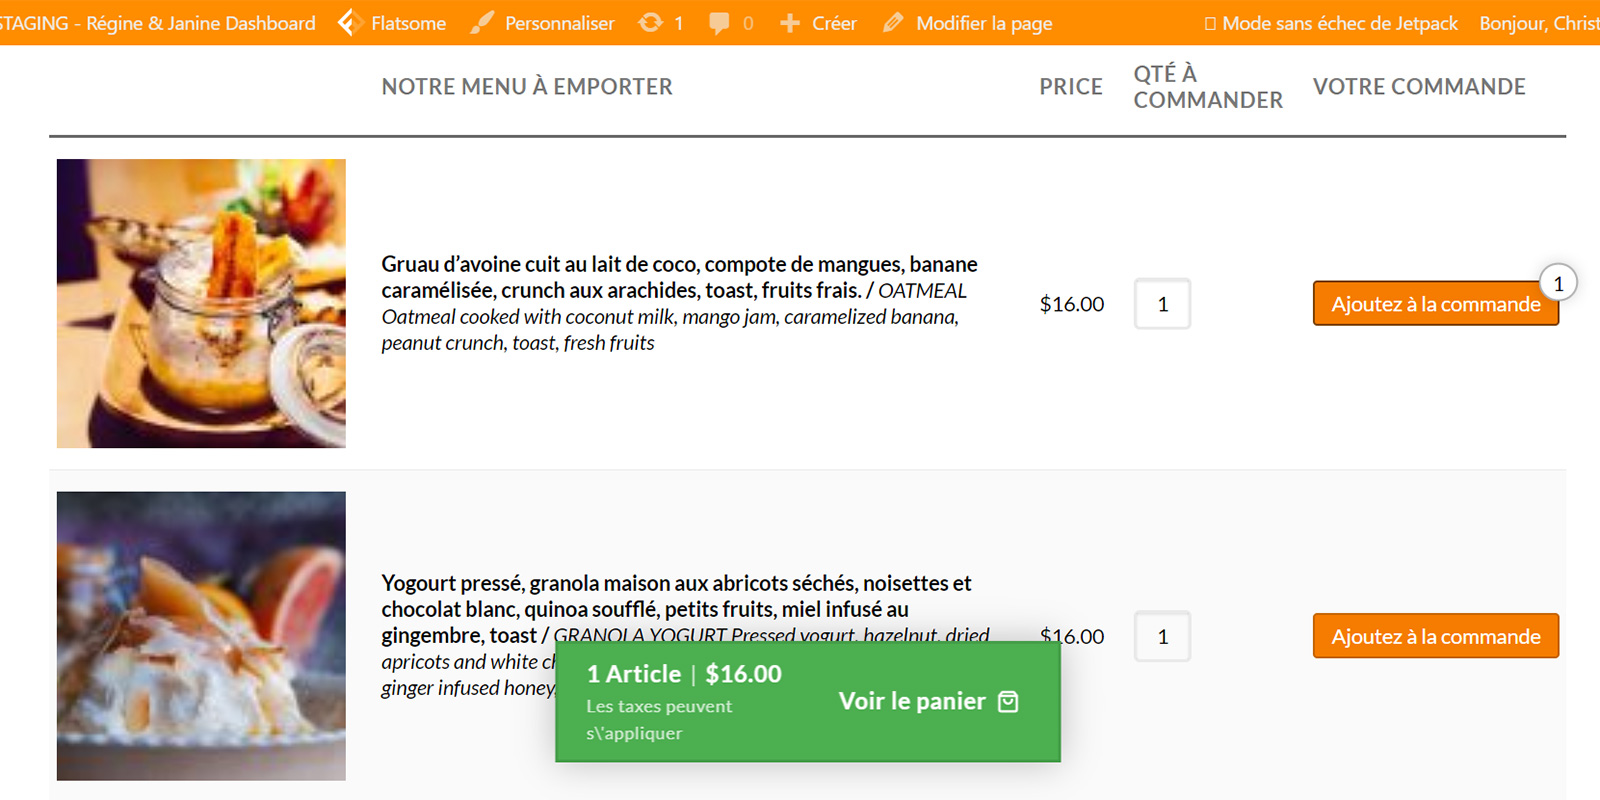
In both free and premium versions of WooODT, the customer can see and select the date and time of pick-up or delivery, on the product catalog sidebar and the checkout page.

It’s nice for the customer to see the date and time right on the product catalog. Then, the selected date and time appear on the checkout page.
Delivery Slots also limits the number of orders per time slot. You can add a shortcode to a page or a widget to show a table with all the available time slots.
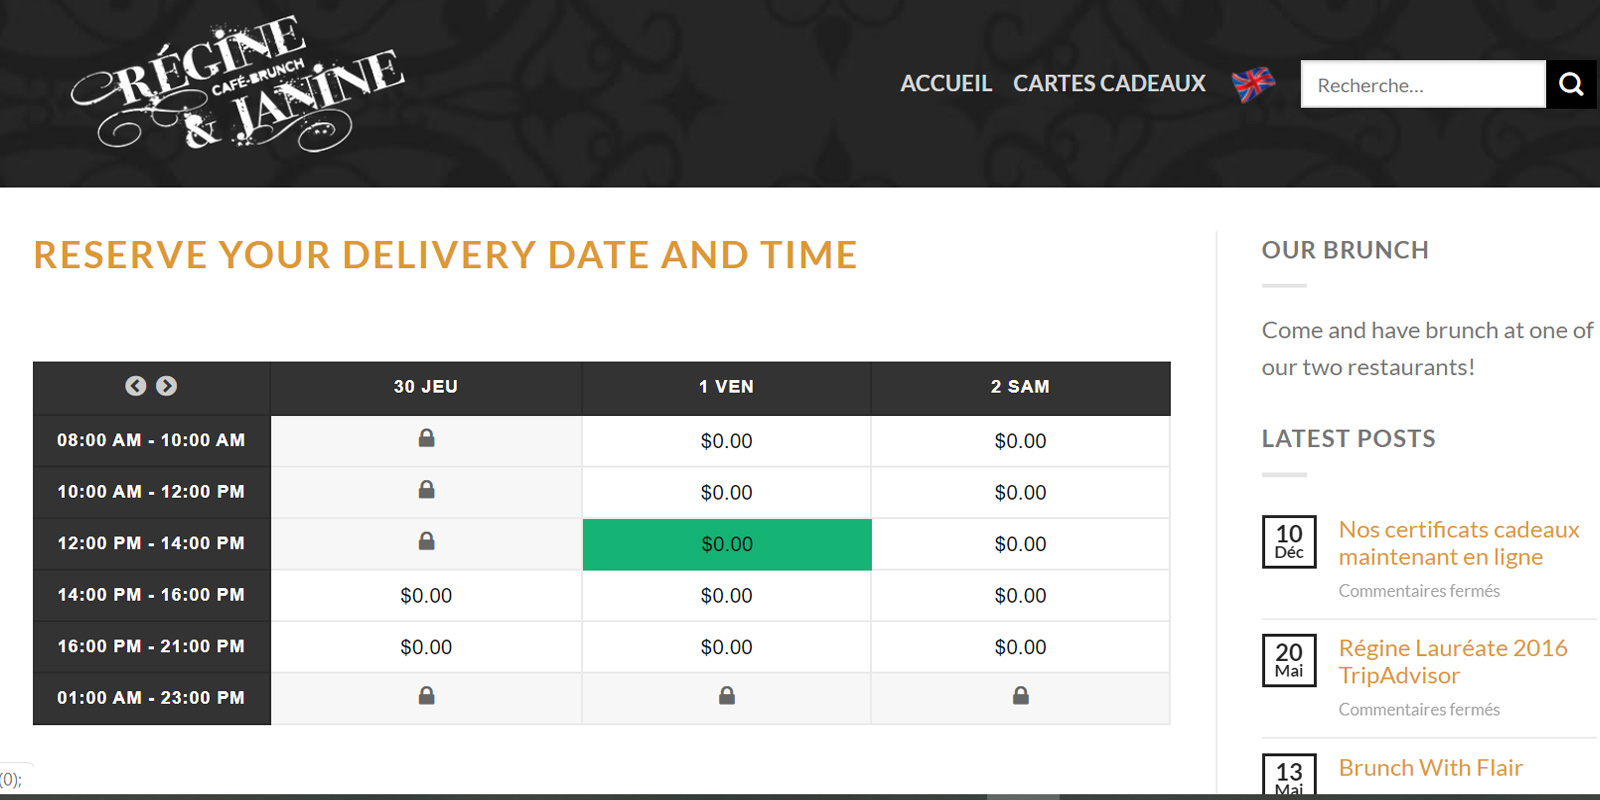
However, every time slot shows a zero if there is no cost for delivery or pick-up. It seems confusing.
And you see the delivery time on the checkout page.
-
Minimum waiting time
You also need to give some time to your kitchen to prepare the order. Both WooODT Lite (free) and Delivery Slots offer this functionality.
-
Hours of operation and order taking
Your restaurant has hours of operation. But you may like customers to place their orders even when you’re not open. Especially if your online store sells other products, such as gift certificates or merchandise (mugs, T-shirts). You don’t want to limit orders to when you are open.
WooODT Lite (free) allows customers to order even when you are closed and gives them an alert message if they pick a date and time when they cannot pick up or you cannot deliver. Even better, you can select a different schedule for the pick-up and for delivery.
-
Set up your menus
OK, you’re set up for pick-up and delivery. It’s now time to set up your menu and dishes in WooCommerce.
-
Layout of your product catalog page (menu page)
The product catalog page is your “restaurant menu” page. It is the page showing all your menu items. By default, WooCommerce will show each product (menu item) in a grid.
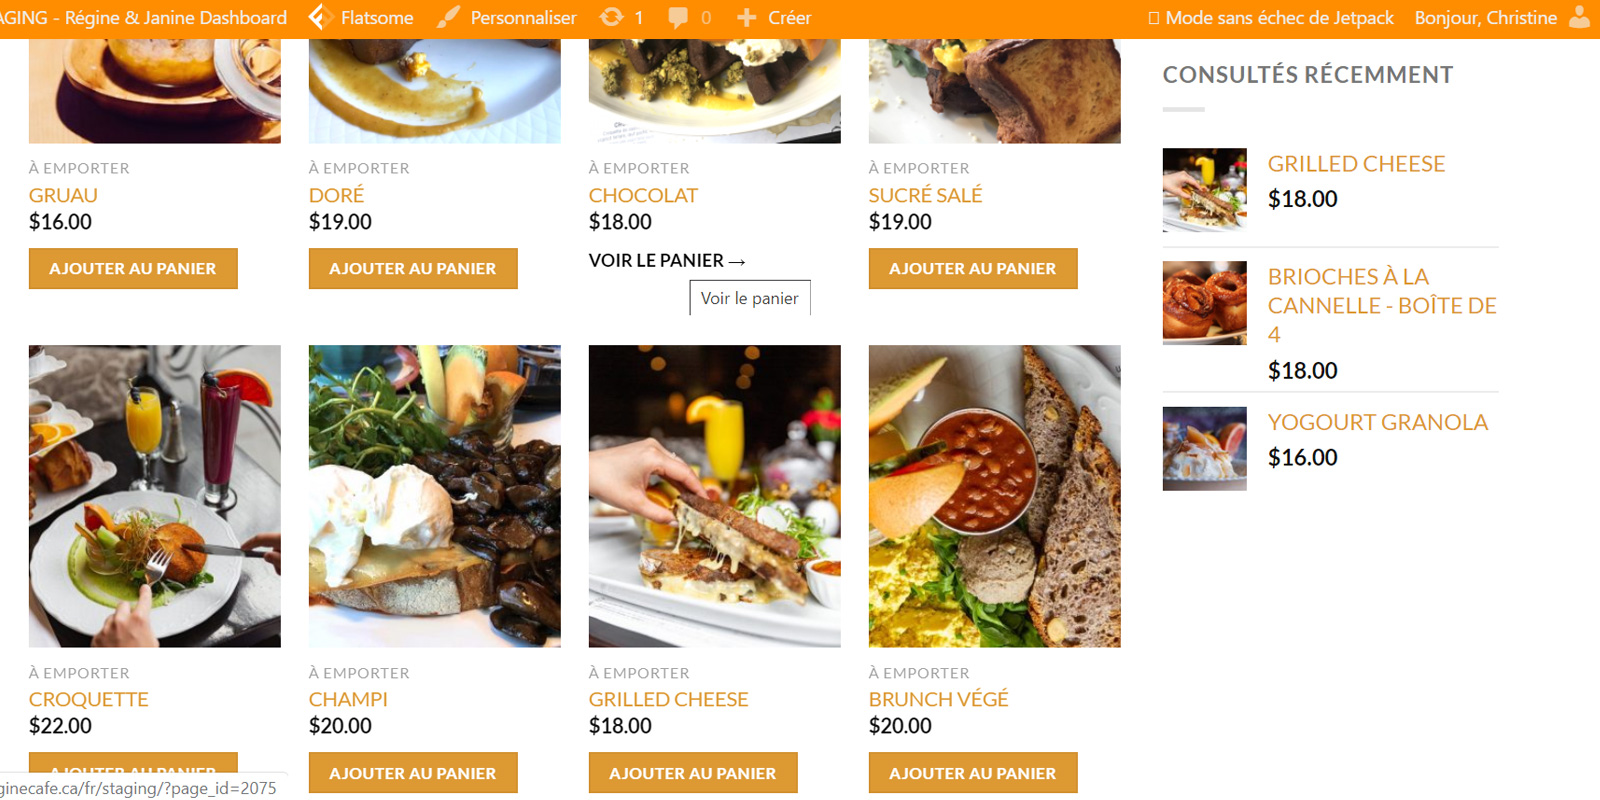
If you prefer, you can choose to present them in a table, by using the Product Table plugin (free or premium.)
You can also create separate menu sections on the page using product categories (appetizers, main dishes, desserts, drinks.)
You can decide on the order of the menu items on the page (see WooCommerce customizer) or feature specific items (see later.)
If menus differ in each of your restaurant locations, you can create a different menu page for each location, by assigning a different category to each location, e.g., categories “location A” and “location B”. However, as discussed above, having different menus adds complexity. You must minimize the risk that a customer can inadvertently place an order on “location A” menu and then choose “location B” pick-up.
You can also add a sidebar on your menu page, with day and time of pick-up/delivery, popular menu items, etc.
-
Set up of your menu items
It is rather simple. For each menu item, you will enter its name short and long descriptions, price, categories (the type of dish, location, etc.), add-ons for an extra charge, variations, tags (gluten-free, vegan, etc.) and a photo. The quality of photography is paramount.
Make sure to list allergens contained in any dish, as well.
Here are some general principles:
-
-
Categories
-
You should set up categories for your various menu items, such as appetizers, main dishes, desserts, and drinks. As mentioned above, it is helpful when organizing your menu page.
-
-
Locations
-
If your menus differ from one restaurant to another, we saw that you can set up categories to define in which restaurant a specific menu item is available.
-
-
Add-ons, variations, and tags
-
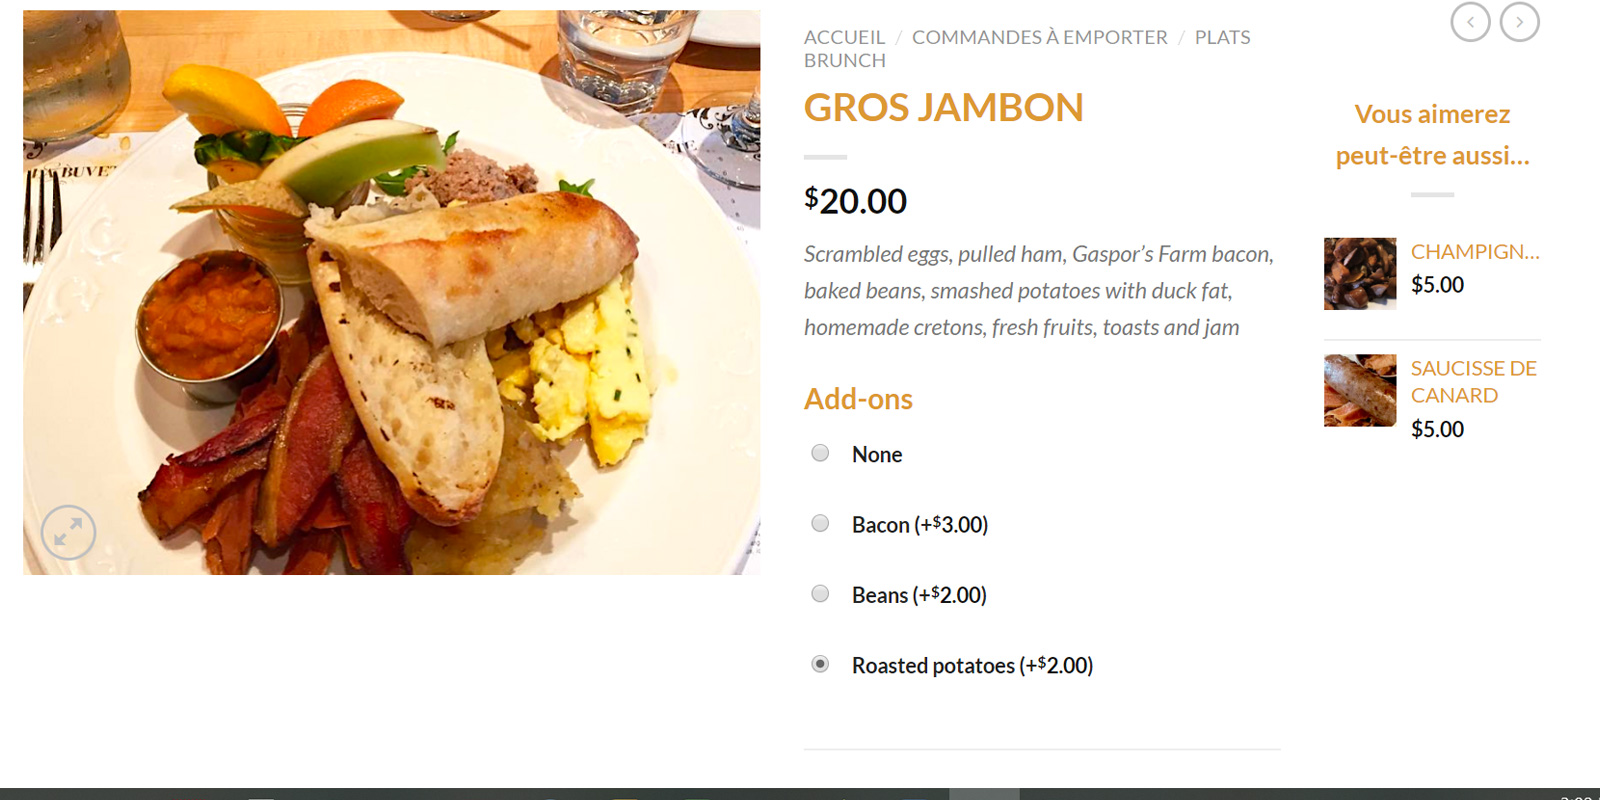
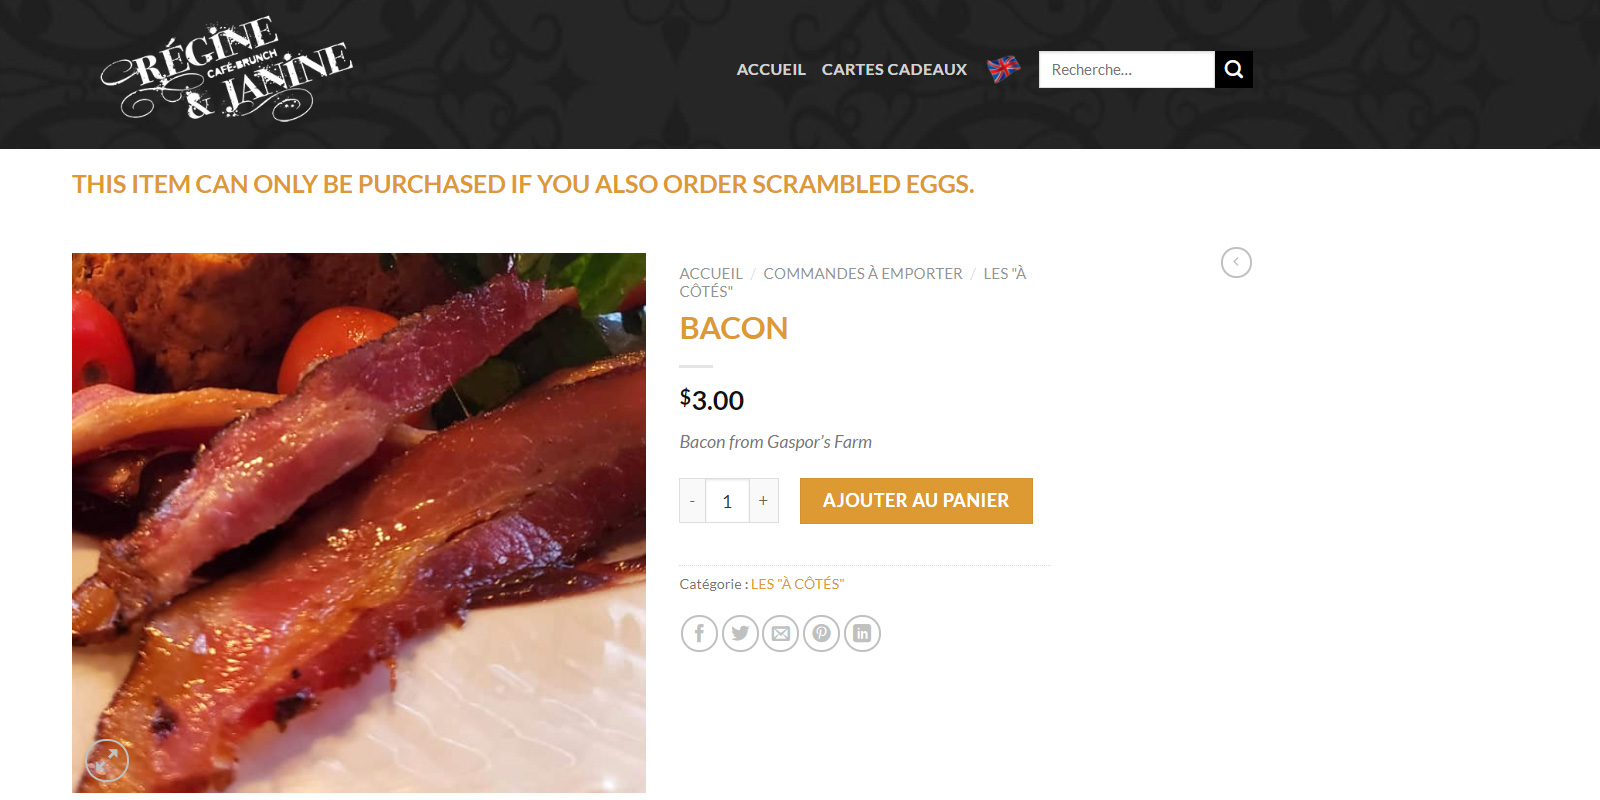
You want customers to be able to add bacon or beans for an extra charge to their breakfast eggs? You can do it!
Get the Product Add-on plugin, and you will easily set add-on items to any menu item (product) or to one product category.
It’s essential though to understand the difference between a Product Add-on and a Checkout Add-on. For things you want to add to the whole order, such as tips or isothermal packaging, you want the Checkout Add-on plugin, not the Product Add-on plugin.
You can also decide to offer one menu item X only to customers who are also purchasing item Y. To do so, simply use the Product Dependencies plugin.
You can also set up Product Variations: e.g., you sell 2 types of scones, a traditional and a gluten-free version.
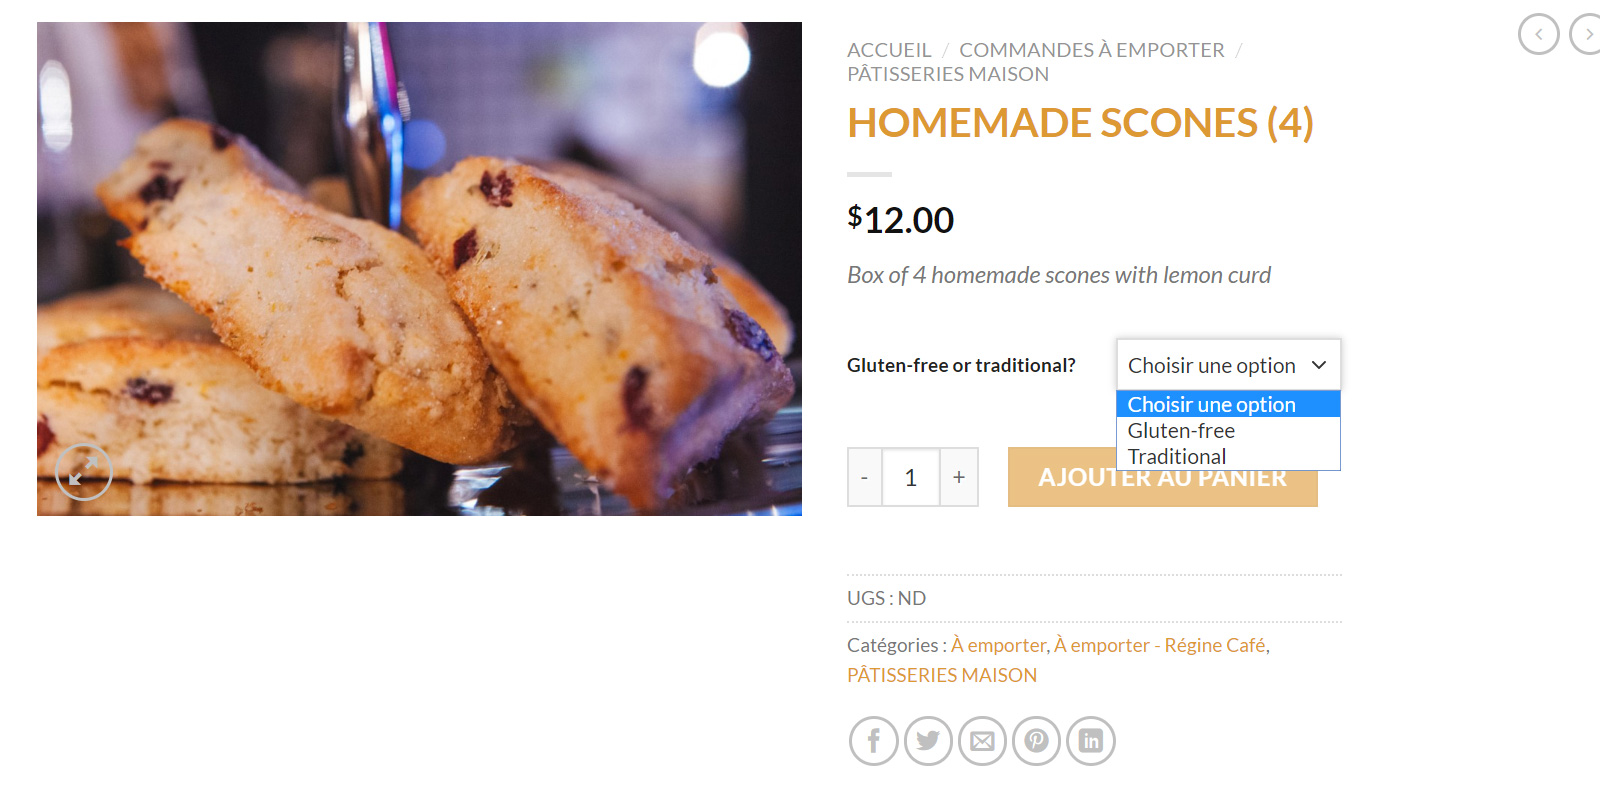
You can also add “tags” or “attributes” to your products to indicate if they are gluten-free, vegetarian, or vegan. Attributes will allow the visitor to filter menu items by that feature.
-
-
Featured menu items
-
In the list of products, click the star for the products that you want to be featured. You can then show them in a separate section on your home page, for instance.
-
-
“On sale” menu items
-
Simply indicate a promo price and the start and end dates for the promotion, the menu item will show as being “on sale.”
-
Handle other products in your shop
You may sell other products online, such as gift certificates and merchandise (mugs, T-shirts.)
However, if you sell other physical products, be aware that it will add complexity, as those are usually shipped by mail, whereas menu items are set up for “local pickup or delivery”.
On the other end, downloadable products, such as gift certificates (pdf vouchers) won’t interfere in the checkout process.
-
Define checkout and payment methods
Next, you need to think about order payment and notifications.
-
Checkout add-ons (e.g., tips, isothermal packaging)
To add these items at the time of checkout, you’ll need to use a Checkout Add-on plugin.
Note of caution: In some articles, they mentioned using the “Name a price” plugin for tips. It creates a product for which the price is set by the customer and which can then be added to the cart. It sounds like a terrible idea. Having tips shown as a product doesn’t look professional and will be confusing.
-
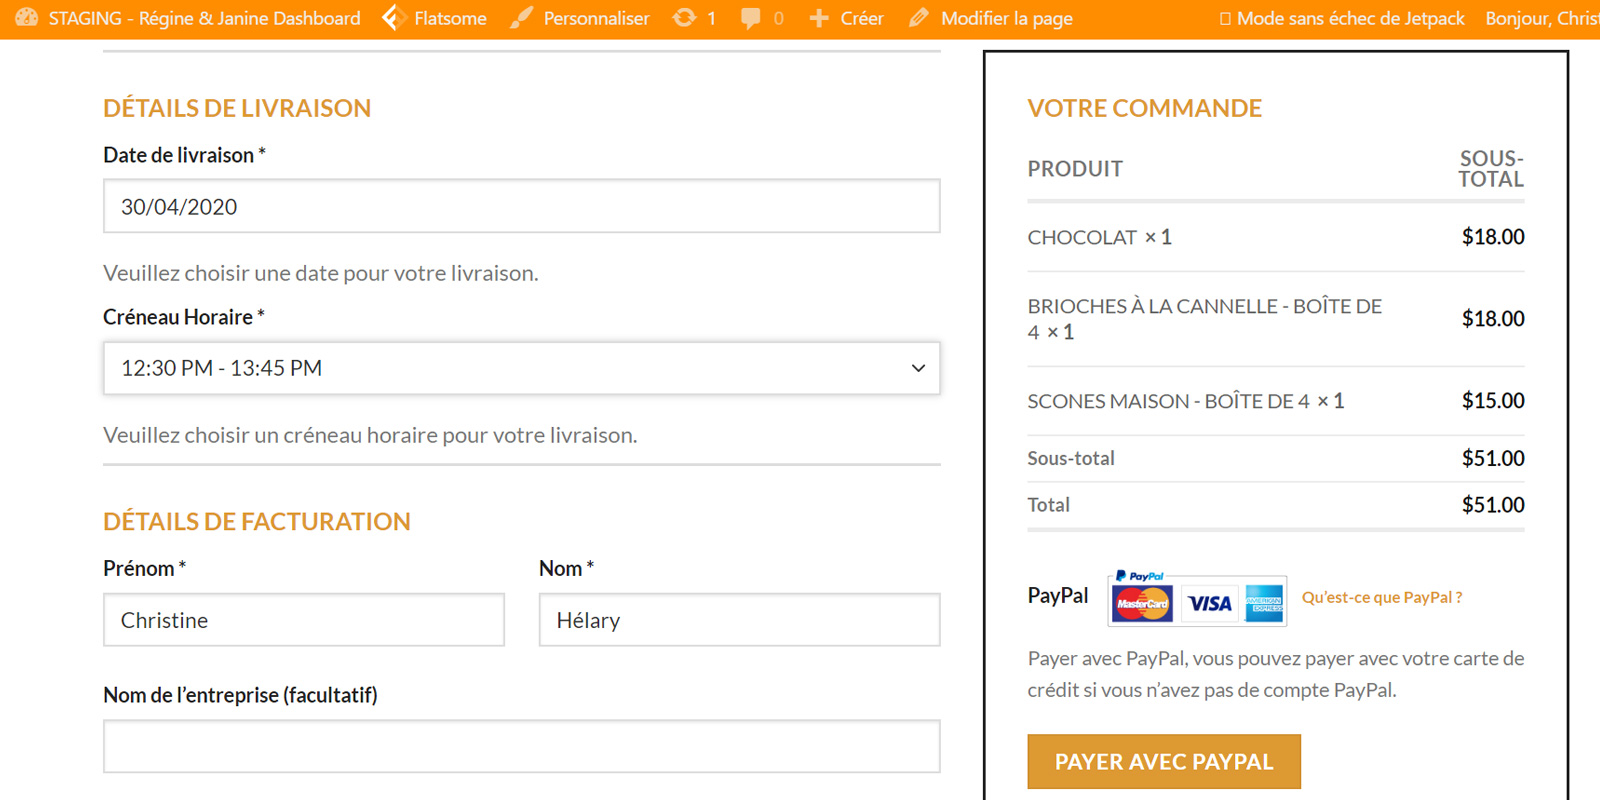
Selecting payment methods
In our experience, using PayPal, with the option to pay with credit cards, works well. And it’s very easy to set up in WooCommerce. Simply connect your shop to your PayPal business account in the WooCommerce/Settings/Payments tab under PayPal “manage”.
You can also use Stripe.
-
Order notifications to your restaurants
By default, WooCommerce will email each order to the shop or restaurant owner.
Different plugins exist, for additional functionalities:
- Twilio SMS notifications plugin to receive notifications by SMS.
- Advanced Notifications plugin if you have several locations and you want to send each location their respective orders.
-
Test your online pick-up and delivery service setup
OK, you are now ready to take your first pick-up or delivery orders! Your restaurant chefs are in the kitchen waiting for their first order!
One more step before you hit “Go”: You want to test that everything is working as it should.
-
Your online restaurant service on desktop, tablet, and mobile
Your WordPress theme may allow you to have different settings for mobile (the Flatsome theme does).
Check that everything is set correctly for mobile (images, menus, etc.).
Also check each step, from viewing the menu to adding an item to the cart, adding extras, viewing the cart all the way to checkout, and payment.
-
Testing payments with PayPal sandbox
Finally, you want to check if the orders go through properly and how the customer’s emails look.
It can get a bit confusing to set up such an account. Refer to the PayPal information for more details.
The key steps are:
- Create a developer account, similar to a PayPal account, at developer.paypal.com
- Within that account create a sandbox account
- In WooCommerce, enable PayPal sandbox (PayPal page) and connect to the PayPal sandbox account you created.
That will allow you to place “fake” orders without draining your credit card or your PayPal account!
Everything works well? It’s time for your kitchen to be busy!
Let us know if you have any questions on your WooCommerce shop setup for multi-location food pick-up and delivery!
To read more about the online strategy of Régine Café, visit: Online Success Story: Régine Café